
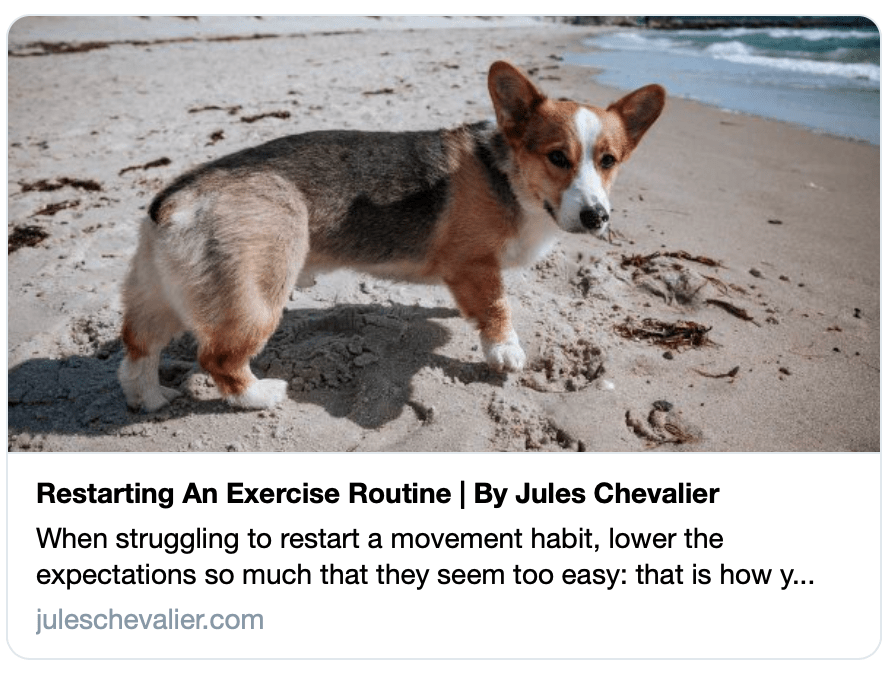
Custom Social Sharing Cards With Gatsby
March 31st, 2021
As I've been sharing links more often from my website, I noticed that when I would share a link over text or slack that the social card could be improved.
Starting point

Observations
- The image is the same default site image every time I share an article, even though each article has a custom image
- The titles of the articles don't show - only the site title
- The description displayed is the one for the site, I'd like to have it display a summary of each article instead
Approach
I'm going to tackle this piece by piece. First I did some research to understand what is ahead so I can make a plan. Here are the options I found:
Option 1: No custom photos, but programmatically generated text to image
There's a also good series from Learn with Jason Part 1 and Part 2 and the resulting npm package get-share-image
Option 2: Custom photo, with custom overlay area with text
Option 3: Custom photos with no text overlay
Custom image with default fallback
Selection
I opted to go with option 3 because it was most important to me to have the unique article image (that I photographed!) display with each link. I didn't want text to overlay the image, but I did want the article title and description to display.
Implementation
1. Add a prop to the layout component to take in the frontmatter for the article image.
I already had the image in the frontmatter
featuredImage: "IMG_1234.jpg"
I added this to my articleTemplate.js file and pass image as a prop into my layout component.
//articleTemplate.js

const { featuredImage } = frontmatter
const ogImagePath = featuredImage && featuredImage.childImageSharp.fixed.src

...

return (
  <LayoutMain title={`${frontmatter.title} | By Jules Chevalier`} image={ogImagePath}>
  ...
  </LayoutMain>
)
I already was using the site thumbnail as the image for the social card, so I added the new image from props and if that doesn't exist, it will default back to the site image.
// layout-main.js
<meta
  property="og:image"
  content={
    props.image
      ? `https://juleschevalier.com${props.image}`
      : data.site.siteMetadata.thumbnail
  }
/>

<meta
  name="twitter:image"
  content={
    props.image
      ? `https://juleschevalier.com${props.image}`
      : data.site.siteMetadata.thumbnail
  }
/>
⚠️ Note the reason for not using just props.image is that is only a partial path from the root url. You need to add your domain name for the image to be reachable.
2. Crop the article images with different aspect ratio
I realized that the images were not the right size, so they weren't showing up in the validators. According to CSS Tricks
[The image] should be at least 600×315 pixels, but 1200×630 or larger is preferred (up to 5MB). Stay close to a 1.91:1 aspect ratio to avoid cropping.
I was using the same image for the article photo, but that had a different aspect ratio (1.5).
I was able to add a new query in articleTemplate.js for the social image, cropping to 1200 x 630. I used a fixed query for this. Next, I noticed the crops of the images were not in the center, which I didn't like. Looking into gatsby image query params, I noticed it uses gatsby-plugin-sharp which has cropFocus and fit as options.
export const pageQuery = graphql`
  query($path: String!) {
    BlogPostByPath: markdownRemark(frontmatter: { path: { eq: $path } }) {
      html
      frontmatter {
        date(formatString: "MMMM Do, YYYY")
        path
        title
        topic
        featuredImage {
          childImageSharp {
            fluid(maxWidth: 860, quality: 75) {
              ...GatsbyImageSharpFluid
            }
          }
        }
      }
    }
    SocialImage: markdownRemark(frontmatter: { path: { eq: $path } }) {
      frontmatter {
        featuredImage {
          childImageSharp {
            fixed(width: 1200, height: 630, cropFocus: CENTER, quality: 50) {
              ...GatsbyImageSharpFixed
            }
          }
        }
      }
    }
  }
`
3. Update the card title to the article title
Since the title of the article was already getting passed to the layout component for the page title, I just had to add the option for the social cards
// layout-main.js
<meta property="og:title" content={props.title || data.site.siteMetadata.title} />
...
<meta name="twitter:title" content={props.title || data.site.siteMetadata.title} />
4. Descriptions
Next, I wanted to have a short description or summary of each post that I could use for the cards that display it. Twitter, Facebook and search use this. LinkedIn and iMessage does not.
I started by adding a new field to frontmatter called summary and added that to each article. It seems for SEO the character max is 160.
// articleTemplate.js
<Layout
  ...
  description={frontmatter.summary}
>
Then I added it to both the open graph and twitter descriptions. It was already an option for the page description, but I am showing that also for consistency sake.
// layout-main.js
<meta
  name="description"
  content={props.description || data.site.siteMetadata.description}
/>

<meta
  property="og:description"
  content={props.description || data.site.siteMetadata.description}
/>

<meta
  name="twitter:description"
  content={props.description || data.site.siteMetadata.description}
/>
Testing
To test on localhost, I found a lot of mentions to use ngrok which I have found super useful in the past. I couldn't get any of the validators to successfully load the cards though (even though the links were working).
So of course I pushed to production 🙈 to test. ¯\_(ツ)_/¯
Sites I used for testing:
⚠️ you need an account and to be logged in for these to work (except iframely)
Adjustments
I realized that I had been missing a few open graph tags when testing on facebook and linkedin. I added og:type for article and updated the og:url to link to the specific article and not the homepage.
This is an excellent reference for the html head tag
Result
Now each time I share an article, the image is what a reader will see when they click the link. Additionally the card has a correct title and description, so they have a sense of what the link will show them.
Here is the final tags I used:
<meta property="og:type" content="article" />
<meta property="article:author" content="" />
<meta property="og:title" content="" />
<meta property="og:site_name" content="" />
<meta property="og:description" content="" />
<meta property="og:image" content="https://example.com/image.jpg"/>
<meta property="og:image:alt" content="A description of what is in the image (not a caption)" />
<meta property="og:url" content="https://example.com/page.html" />
<meta property="og:locale" content="en_US" />
<meta name="twitter:title" content="" />
<meta name="twitter:description" content="" />
<meta name="twitter:image" content="https://example.com/image.jpg" />
<meta name="twitter:image:alt" content="A description of what is in the image (not a caption)" />
<meta name="twitter:card" content="summary_large_image" />
<meta name="twitter:url" content="https://example.com/page.html">